What's In This Post
This post provides you a guide on airbrush legs makeup similar to the Sally Hansen Airbrush Legs Spray. This type of airbrush legs makeup comes pre-packaged in a spray can and you don’t need airbrush kits to apply the makeup. Match the shade of makeup to the area that you’re going to cover-up
If you prefer to use an airbrush kit, I have included a recipe for DIY airbrush legs makeup that you can use with airbrush kits for your legs. I’ve also included a method to waterproof your airbrush legs makeup for swimming.
Contents
How to Prepare Legs for Airbrush Legs Makeup
The easiest way to prepare your legs for airbrush legs makeup is to make sure that your legs are shaved, exfoliated, cleansed, and moisturized. Then, apply a cream primer to cover up veins, scars, or unsightly blemishes.
Prep Your Skin
First, prepare the area that you’ll apply makeup to. Before applying makeup to your legs, be sure that the skin is shaved, exfoliated, cleansed, and moisturized. Removing the dead skin cells from your legs will help the makeup adhere to your skin and even conceal evenly.
Apply Primer
If you’re trying to cover up veins, scars, or unsightly raised blemishes, try adding cream primer or gel to your troubled spots after you’ve applied your moisturizer. This will help to even out the surface of the troubled areas and better hide your flaws. the primer will also help the makeup adhere better to your skin, making it last longer.
Choose or Custom Your Shade
In most cases, products like the Sally Hansen Airbrush Legs Spray will have a shade that is very close to your natural shade. Before you settle on a color, spray a small amount on your legs to ensure that it indeed matches or is a close match.
A “close match” is usually good enough for the legs as you’ve planning to cover your entire legs in airbrush makeup and not just certain sections.
However, if you find that the stock shades are either too dark or light for you, you can customize the shade by following these steps:
- Purchase an extra bottle of spray that is either darker or lighter than the one that matches closely with your shade.
- Spray a good amount of the makeup that closely matches your shade into a small mixing bowl.
- If you want a darker shade, slowly spray the darker shade makeup into the bowl. Mix with a brush and test on your skin. Add more makeup of the darker shade into the mixing bowl if needed. Repeat this step with a lighter shade if you want to go lighter.
- Once you have the shade you want, apply the makeup to your legs with your hands or makeup sponge.
How to Apply Airbrush Legs Makeup to Cover Scars, Stretchmarks, Veins, and Dark Spots
Airbrush makeup is much simpler to apply than cream makeup or powder makeup because no sponge or brush is required for application. The spray will provide more coverage and provides your skin with a smooth appearance.
The best way to apply airbrush leg makeup to cover scars, stretch marks, veins, and dark spots is to first apply a liquid concealer on the blemish, mark, or dark spot. Shake the makeup can well and spray the makeup at your legs while holding the can at about 6in (16cm) away from your skin. Spray the makeup on your hands and apply the makeup on hard to cover areas like your knees.
To determine the shade of your concealer, use basic color theory and the opposite color of the color wheel to help you determine which shade to use. I’ve included a color wheel below for your reference:
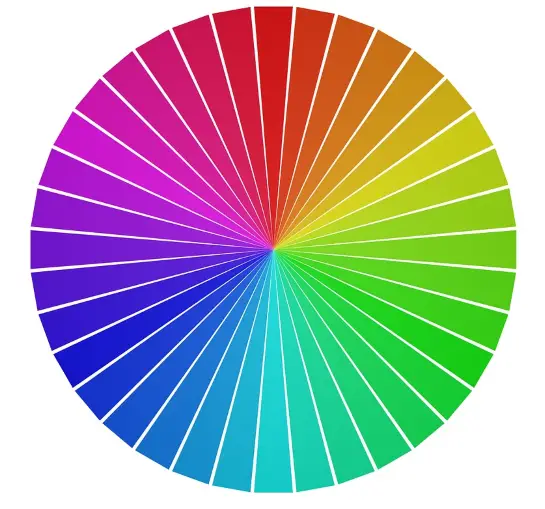
For example, if you want to cover a bruise that appears purple, use a red or orange-based concealer to neutralize the tone. This will make it much easier for your airbrush leg makeup to cover the dark spot.
Below are the general steps to follow when applying airbrush legs makeup:
- Shake Well – Shake the can well and hold it about 16cm from your leg and begin spraying. We recommend spraying the airbrush directly onto your leg first. Spray the outside of your shin and blend it as evenly as possible. Next, spray the inside of your shin and blend that evenly as well. Repeat this process with the back of your knees and thighs.
- Use Your Hands – Your knees and your feet will require that you spray the makeup directly into your hands and apply it to your hands and feet while blending it evenly.
- Let it Dry – After applying the makeup, wait for 60 seconds to prevent any chance of the makeup rubbing off onto your clothing.
- Get Dressed! – Head out of the door and strut your stuff!
Be sure not to put on any moisturizer after you’ve applied the makeup. It will make your skin moist and cause the makeup to rub off.
How to Waterproof Airbrush Legs Makeup For Swimming
Since the makeup is likely silicone-based and water-resistant, there are only a few steps to follow to make it more durable so that it stays in place even while you’re swimming.
The best way to waterproof airbrush leg makeup for swimming is to apply a makeup primer on clean skin, apply the airbrush leg makeup and then seal it in with a waterproof setting spray.
Here’s What You Need To Do:
- Apply Primer – First, apply makeup primer on your legs. The primer helps your makeup stick better to your skin. You can use the same one that you normally use for your face. Apply the primer to your hands and run it into your legs evenly.
- Apply the Makeup – Once the primer has settled into your skin well and your legs aren’t moist to the touch, spray the airbrush makeup evenly on your legs.
- Use a Waterproof Setting Spray – Seal in your airbrush leg makeup by using a waterproof setting spray. Hold the spray around 6in away from your skin and spray your legs until you’ve got most areas you want waterproof covered. Allow a few minutes for the product to dry before going into the water.
How to Make Your Own Airbrush Legs Makeup
Aside from the fact that it’ll save you some money in the long run, DIY airbrush makeup is better for your skin than store-bought makeup in some cases. Primarily because you know what the ingredients are.
Follow these simple steps with easy to find ingredients to make your own airbrush makeup for legs:
What You Need:
- ½ cup of glycerin
- 2 cups of baking soda
- 4 cups of cornstarch
- 4 cups of vinegar
- 1 cup of water
- Jars for storage
- 1 bottle of foundation or concealer in your shade
Here’s What You Need To Do:
- Begin by making the base: mix the vinegar and baking soda thoroughly in a bowl, and set it to the side.
- Mix the cornstarch and glycerin and then add it to the mixture from step one.
- Continue mixing all of the ingredients until it has a whipped-like consistency. Make sure there aren’t any pockets of air or lumps in the mixture.
- Slowly add water to the mix, using a dropper if you have one. That allows you to control your desired consistency at an optimal level. The more water you add, the lighter the consistency will be.
- Now, all you have to do is take about one tablespoon of the foundation you have and mix it with everything. If the color is too light, continue adding until you reach the color that you want.
- Put the mixture in your airbrush gun to see if it comes out of the sprays on the way that you want it. If it’s too thick, add a little water. If it’s too thin, add more cornstarch.
- Store the remaining concoction in a glass jar and away from heat and light.
Airbrush Legs Spray Makeup vs. Airbrush Lotion – Which Should You Choose?
This debate is really going to come down to personal preference as they both yield similar results. There are some notable benefits to each, but the choice is ultimately yours. Check out the list below to decide which one makes more sense for your legs and skin type.
Airbrush Legs Spray Makeup:
- More lightweight
- Gives you a glowy, luminous look
- Looks natural and offers a near-flawless finish without looking cakey or streaky
- Comes in multiple shades and tones
- Easy to apply
Airbrush Legs Lotion:
- Has a thicker consistency that offers fuller coverage
- More of a matte look when it dries rather than a glow or shimmer
- Very natural look, but too much of it can start to look cakey
- Multiple shades and tones
- Easy to apply
As you can see from the listed attributes, the two forms of makeup are really similar. I personally prefer the Airbrush Legs Spray because it’s easier to use in my opinion.